Title here
Summary here
This article follows Getting Started with the ChipWhisperer-Husky, which covers environment setup and hardware configuration.
The goal here is to capture a power trace by following the Lab 2_1A - Instruction Power Differences notebook from NewAE, then interpret it to extract information about what the target is executing.
The firmware analysed is simpleserial-aes-lab2, provided by NewAE in the
newaetech/chipwhisperer-jupyter repository. This program implements a deliberately opaque algorithm: the exercise consists in deducing its behaviour solely from its power trace, without access to the source code or the binary.
Before plugging anything in, it is worth understanding what we are measuring and why it is useful.
A microcontroller does not draw a constant current: its consumption depends on what it is doing. At any given moment, it is the operations executed by the compute units that determine how much current is drawn.
This sensitivity comes from the underlying technology. Modern circuits are built using CMOS logic, in which a circuit at rest (whose states are not changing) draws almost no power. Most of the energy is spent during switching events, when transistors flip from one state to the other. It is not the state of the circuit that costs energy, but the change of state. Concretely, every time a bit flips from 0 to 1 or from 1 to 0, tiny capacitances inside the circuit must be charged or discharged. The current draw at any instant therefore directly reflects the number of bits switching at that instant.
This dependency between the data being processed and the externally measurable power consumption is what makes side-channel analysis possible.
The physical setup is minimal. The SAM4S target board plugs into the CW313 baseboard, which connects to the ChipWhisperer-Husky via the 20-pin connector. The Husky is then connected to the PC by USB.
That single ribbon cable is sufficient: the Husky powers the target, generates its clock, measures its consumption via the integrated shunt resistor, and handles serial communication with it.
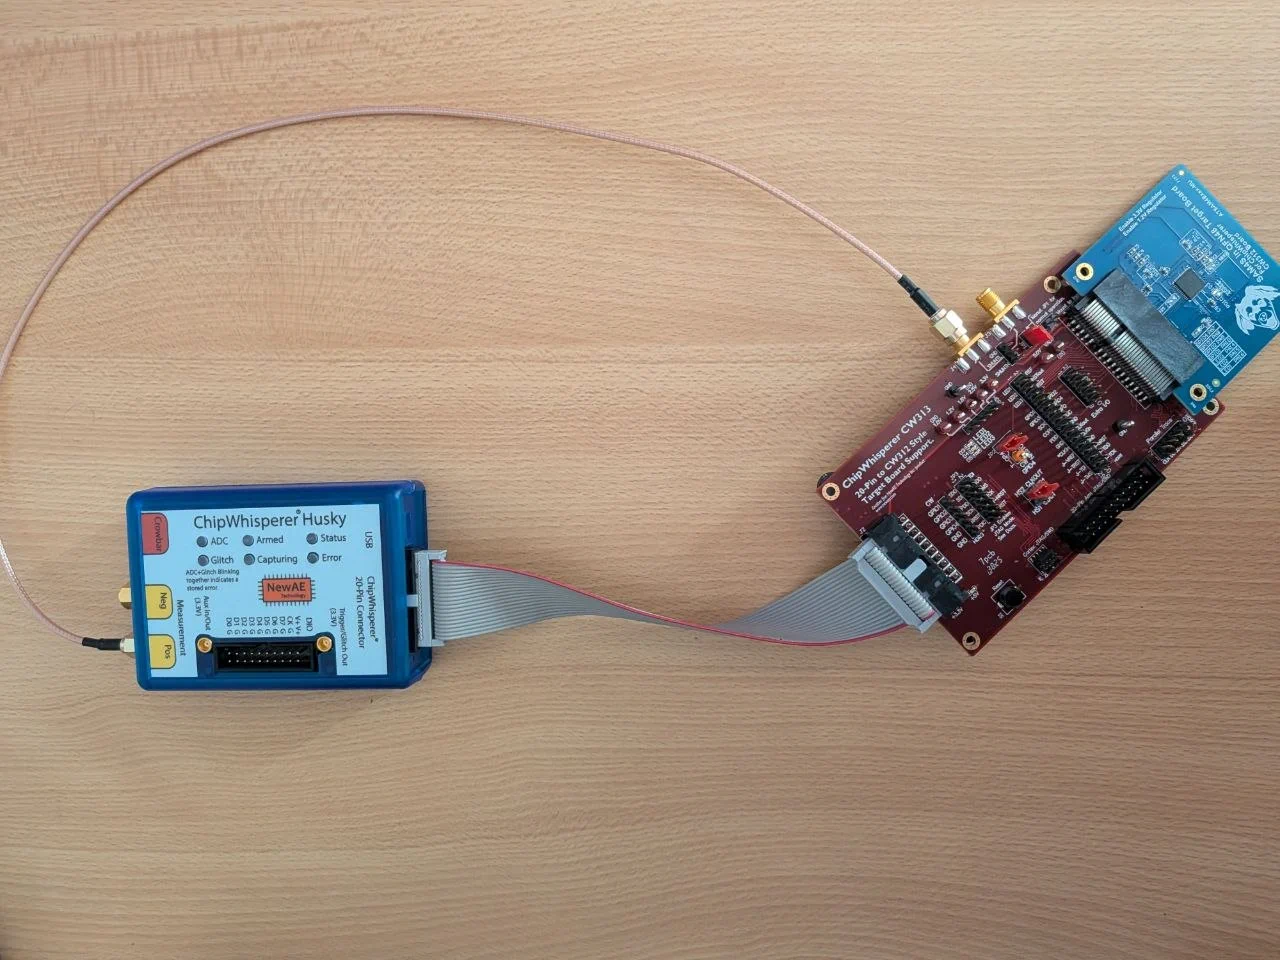
The ChipWhisperer-Husky is the capture instrument: connected to the PC by USB, it drives the entire setup. The CW313 is the intermediate baseboard that hosts interchangeable target boards and exposes the standardised connector towards the Husky. The SAM4S is the target board itself, the microcontroller running the firmware under analysis.
The following code is provided by NewAE, adapted for the ChipWhisperer Husky. It opens the connection with the scope, initialises the target, and defines a reset_target function to restart it between captures.
import chipwhisperer as cw
try:
    if not scope.connectStatus:
        scope.con()
except NameError:
    scope = cw.scope()

try:
    target = cw.target(scope)
except IOError:
    print("INFO: Caught exception on reconnecting to target - attempting to reconnect to scope first.")
    print("INFO: This is a work-around when USB has died without Python knowing. Ignore errors above this line.")
    scope = cw.scope()
    target = cw.target(scope)

print("INFO: Found ChipWhisperer😍")

if "STM" in PLATFORM or PLATFORM == "CWLITEARM" or PLATFORM == "CWNANO":
    prog = cw.programmers.STM32FProgrammer
elif PLATFORM == "CW303" or PLATFORM == "CWLITEXMEGA":
    prog = cw.programmers.XMEGAProgrammer
elif PLATFORM == "CWHUSKY":
    prog = cw.programmers.SAM4SProgrammer
else:
    prog = None

import time
time.sleep(0.05)
scope._default_setup()  # avoids the scope.trace=None bug in default_setup()
scope.io.cdc_settings = 0
scope.glitch.enabled = False
scope.LA.enabled = False
scope.adc.segments = 1
scope.adc.samples = 32000  # determined by iteration: range wide enough to capture the full signal
scope.gain.db = 5

def reset_target(scope):
    if PLATFORM == "CW303" or PLATFORM == "CWLITEXMEGA":
        scope.io.pdic = 'low'
        time.sleep(0.05)
        scope.io.pdic = 'high_z' #XMEGA doesn't like pdic driven high
        time.sleep(0.05)
    else:
        scope.io.nrst = 'low'
        time.sleep(0.05)
        scope.io.nrst = 'high_z'
        time.sleep(0.05)
The connection is established. Before flashing the target, the firmware must be compiled. From the source folder matching our target board:
make PLATFORM=$PLATFORM CRYPTO_TARGET=NONE -jFrom the notebook, the compiled firmware is then flashed onto the target:
cw.program_target(scope, prog, "../../../firmware/mcu/simpleserial-aes/simpleserial-aes-{}.hex".format(PLATFORM))The target is flashed. What remains is to understand how the ChipWhisperer sends data to it during a capture.
The underlying protocol is SimpleSerial, a minimal text-based format developed by NewAE that runs over a UART link between the Husky and the microcontroller. There is no need to implement it yourself: the ChipWhisperer API handles it entirely. A call to cw.capture_trace(scope, target, text) is enough to send the plaintext to the target, trigger the power recording during execution, and retrieve the result, without ever manipulating the protocol directly.
The firmware is in place and the hardware is connected: all that remains is to trigger a capture. The following function sends a plaintext to the target and retrieves the corresponding power trace.
def capture_trace(_ignored=None):
    ktp = cw.ktp.Basic()
    key, text = ktp.next()
    return cw.capture_trace(scope, target, text).wave
This function captures a power trace in three steps:
cw.ktp.Basic() instantiates a key-text pair generator. It draws a random key once at creation time, then ktp.next() generates a new random plaintext on each call while keeping that same key. This is essential: to analyse the traces, many encryptions with different plaintexts but always the same key are needed.cw.capture_trace(): the ChipWhisperer triggers the acquisition at the right moment, sends the plaintext to the SAM4S, and records the current draw while the firmware processes it..wave extracts the raw signal: an array of current measurements sampled over time, one value per clock cycle. This curve is what constitutes the trace.Once the trace is captured, all that remains is to display it:
import matplotlib.pyplot as plt

trace = capture_trace()
if trace is None:
    print("No trace captured")
else:
    plt.plot(trace)
    plt.show()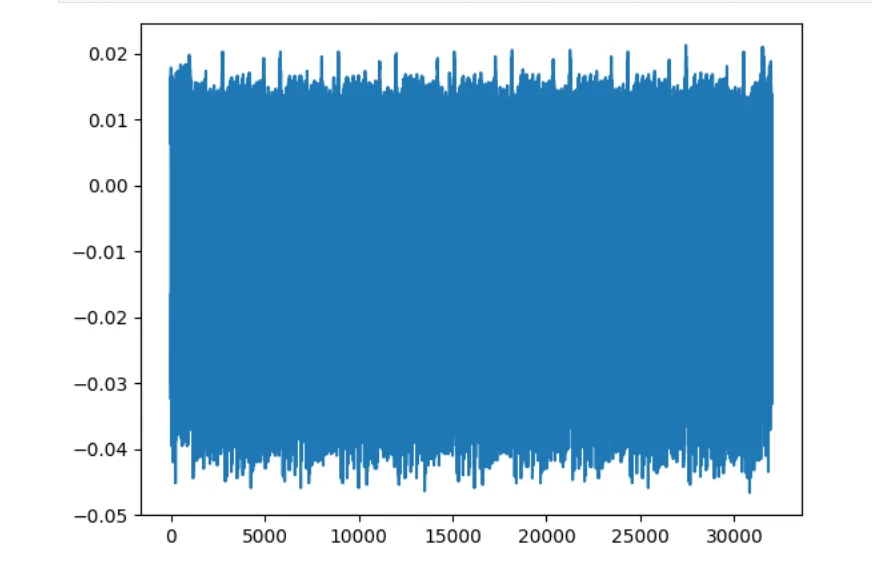
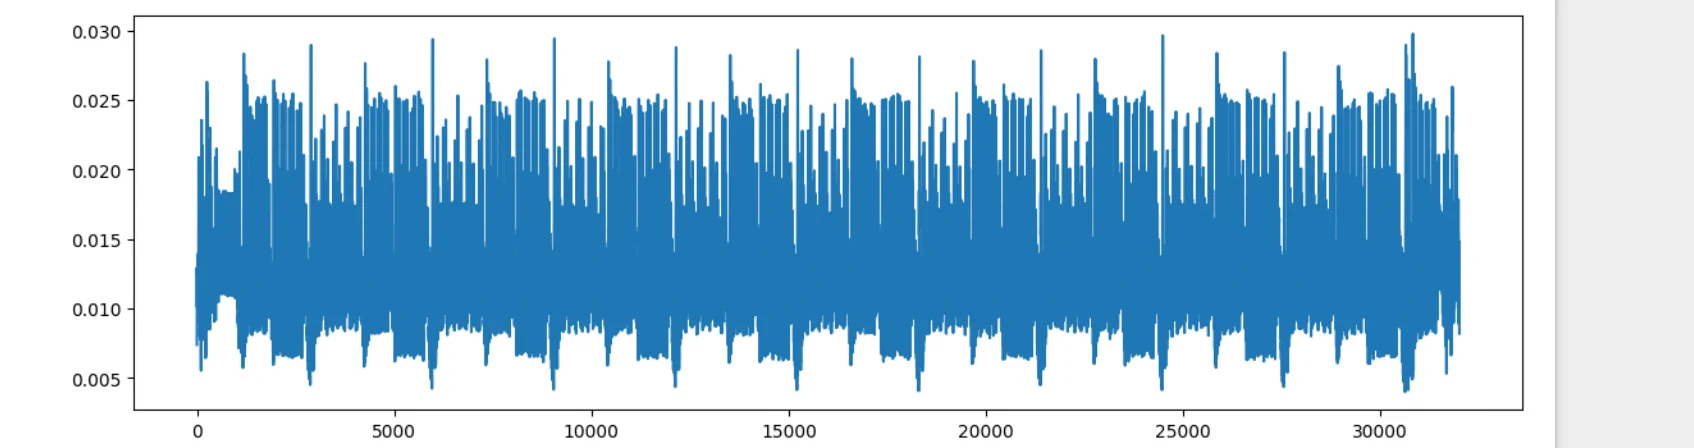
The raw trace is hard to read: the signal is buried in noise. To reduce it, a sliding convolution is applied that replaces each point with the average of itself and the x neighbouring points:
env = np.convolve(np.abs(trace), np.ones(10)/10, mode='same')With a window of 10 points:
With a window of 100 points:
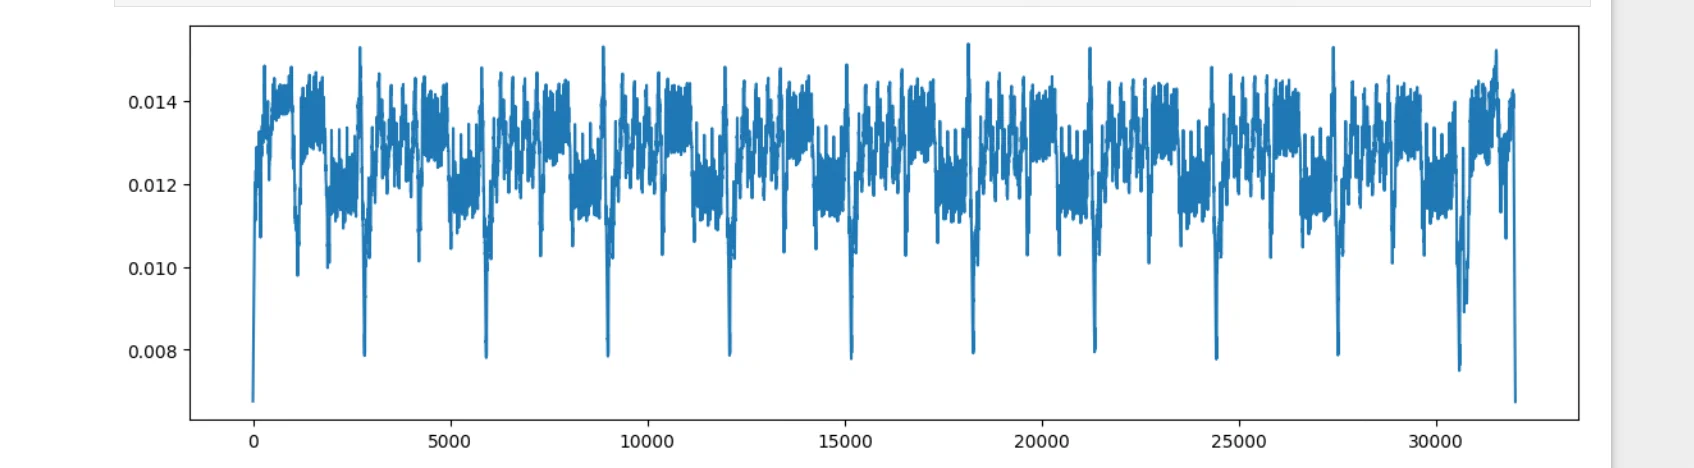
The 10 patterns look similar but are not identical: each AES round operates on different data, which produces distinct switching patterns and therefore slightly varying amplitudes from one round to the next. The regularity of the structure confirms an iterative algorithm, and the number of repetitions unambiguously identifies AES-128 (AES-192 would produce 12 rounds, AES-256 would produce 14).
That observation is not enough to recover the key, though: the relationship between the data being processed and the signal amplitude is too complex to exploit by eye alone.
One caveat about the capture itself: the target board and the NewAE firmware send a GPIO signal to tell the Husky precisely when to start recording, just before AES execution begins. This hardware trigger makes the capture trivial. In a real operational context, this signal does not exist: you then have to find the right moment in the trace yourself, often buried in noise and the rest of the firmware’s activity.
To exploit these traces and recover the key, a statistical approach is needed. That is what we will cover in a forthcoming article, with a correlation power analysis (CPA) attack.